
By Cari Wilson @kayakcari
It’s that time of year in our district again – students in many of our schools are hard at work, designing and building curriculum-based video games as part of Coding Quest. For the most part, the kids build their games in Scratch. The first few years that I supported the students I focused on teaching them some basic skills in Scratch, but mostly in isolation. My hope was that they would take these skills and figure out how to put them together into a game. And lots of them did…especially the kids who already had developed some coding prowess, either through personal interest or summer camps. For other students, this just wasn’t enough to help them go past the very basics. Time to re-think!
So this year, when I go in to help classes, I teach the students how to build games by….ready for it….building games!! Revolutionary, huh?! I never claimed to be a fast learner!
The first thing I do is have a quick visit with the class, introduce them to the look of Scratch, show them some of the functionalities, and assign them the Scratch tutorials as homework. After that, every time I come back we learn the basics of how to build a new type of game. And in building the set game, they develop skills that they can use in building their own games! We build 3 different games to start – a clicky game, a “crossy road” game, and a collecting clones game. In each case, I take time to explain exactly what the game should do. I give the class-specific instructions about what to do to start and then I go back and forth between helping students and actually building the game on my projected laptop, so those who are lost can follow along. I also always have extra challenges, for those who quickly figure out what to do and need the challenge.
The first game we build is a clicky game. The object is to design a space game where an object (star, rocket ship, space rock, astronaut) appears and disappears at random places. Each time the player clicks on the object, they raise their score by one. If they reach a certain, predetermined score, the background changes. At this point, the game builder can either have the game end or have the player move on to the next level.
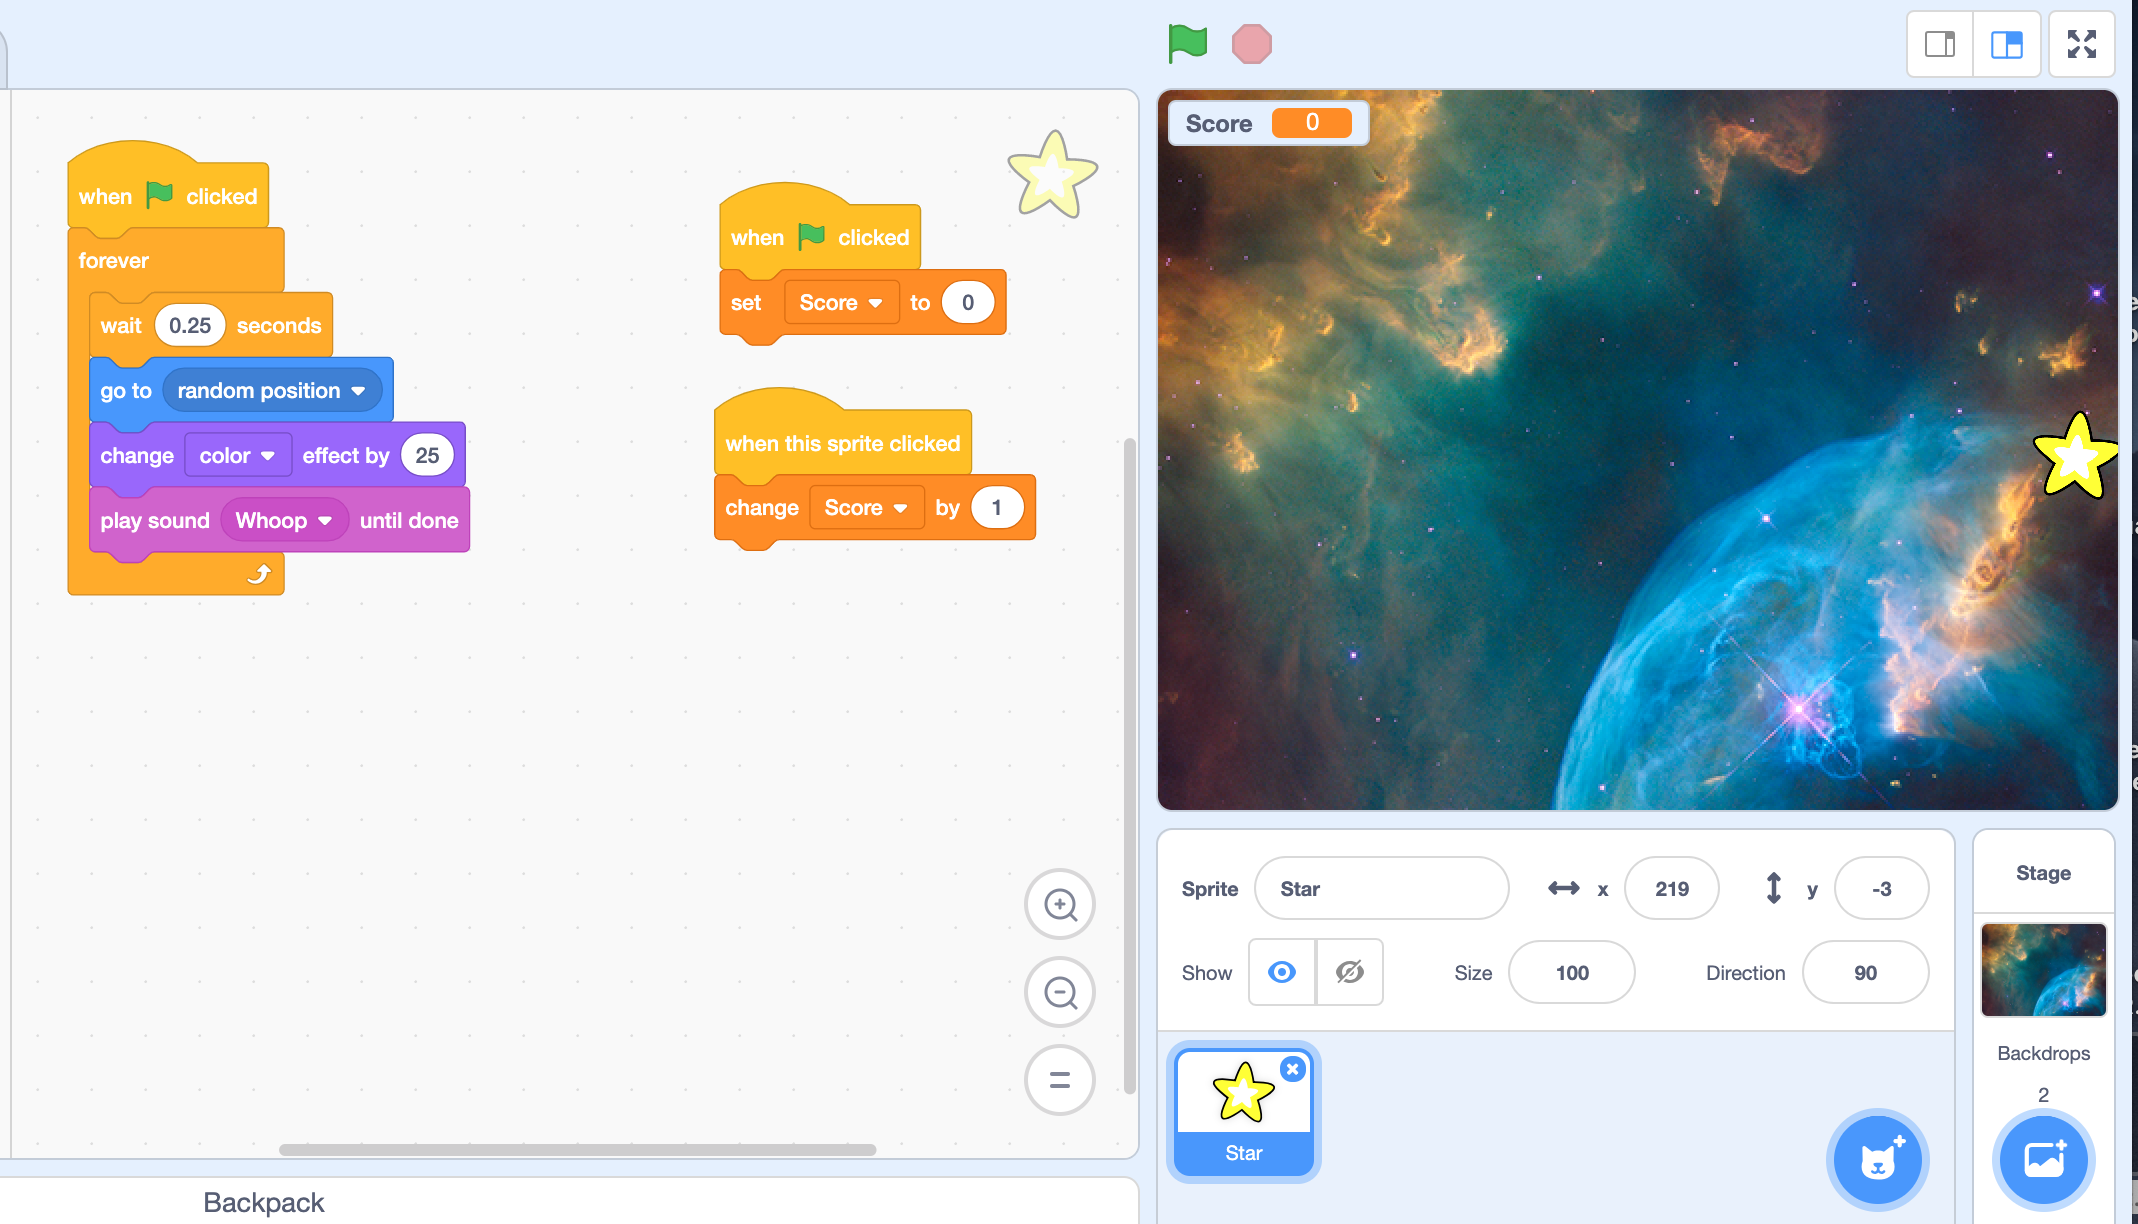
One of the most important skills to learn in this game is how to create a variable, in this case score.
Here is a link to the game, which you can use as-is or remix. Here is a link to a short tutorial on creating a “score” variable in Scratch. It’s in the old version of Scratch, but the principle is the same.
Once the students have built their clicky game, we move to a version of “crossy road” or “Frogger”. In this game, the main sprite has to make its way across the screen, avoiding objects, until it reaches its goal. At this point, it wins the game or moves to a new level. This game has one main, player-controlled sprite and a number of NPC (non-player controlled) sprites.
When we build this game, I give players a choice of themes (space, ocean, city, etc). I start with having them choose a backdrop that fits their theme. They also choose 5 sprites and a button. The first move is learning to program the arrow keys so that the main sprite moves right to left and up and down. In doing this, students learn how to use the x and y coordinates to move a sprite. In fact, the x and y coordinates play a large role in the creation of this type of game.
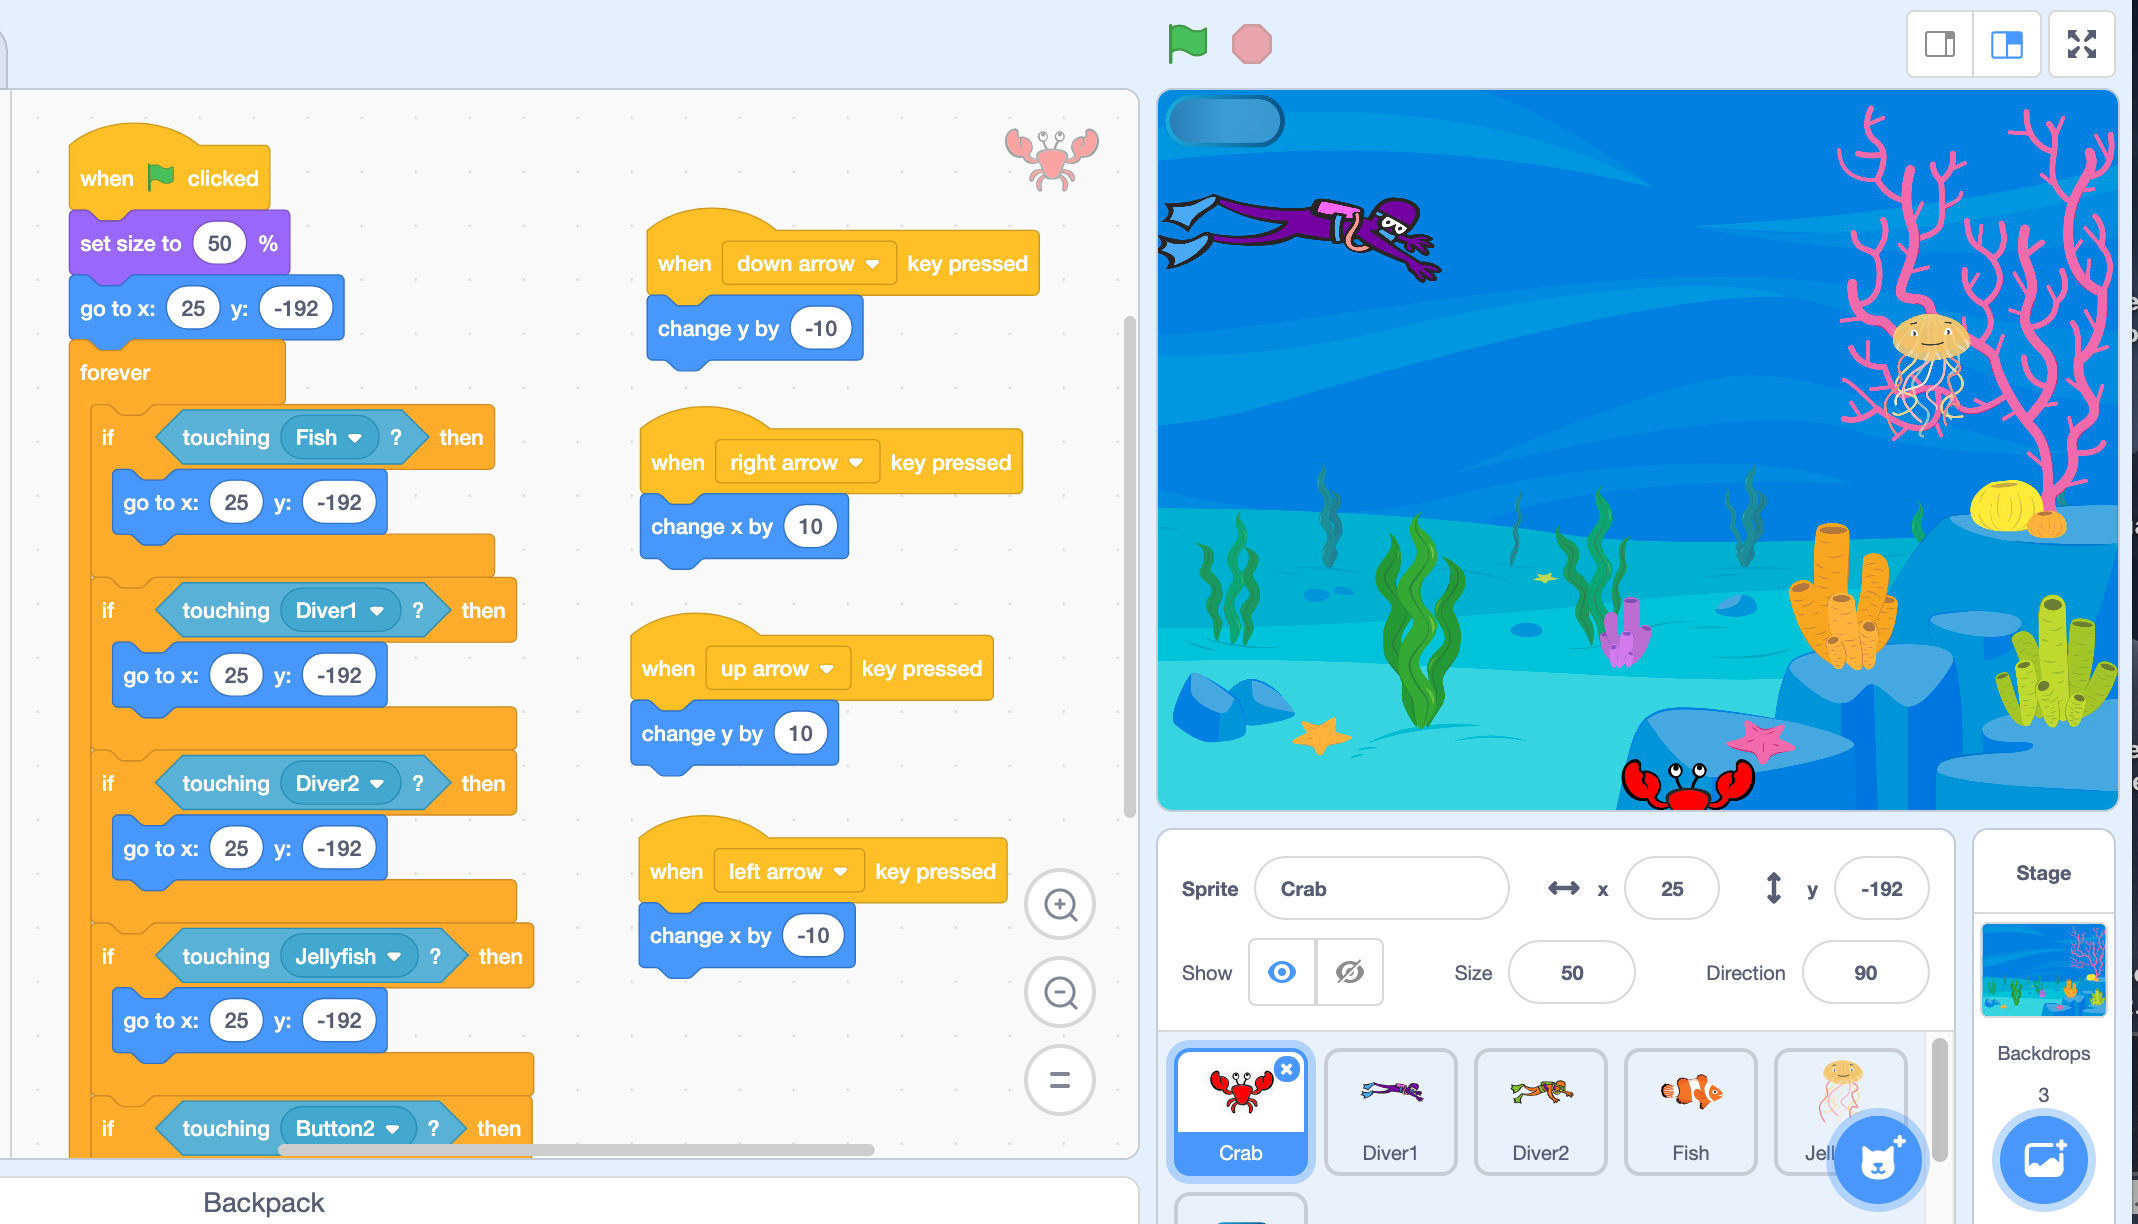
The NPC sprites need to be programmed so that when the game starts they move across the screen at random speeds and at random times.
Stronger students can also code the sprites so that they change costumes every time they appear, to make it look as if there are many NPC sprites, not just a few.
Next, the player needs to add code to the main sprite so that when it accidentally touches one of the NPC sprites it goes back to the beginning of the game.
Finally, when the main sprite manages to get past all of the NPC sprites and reaches the button, the game is either over or players can add in a new, harder level.
Again, here is the game I built, for reference. Here is a link for learning how to move the sprite using the arrow keys and the x and y axes.
The last of the three games we build involves learning how to use the clone tool in Scratch. As you would imagine, the cloning tool creates a number of copies, or “clones” of a sprite that behave exactly the way the sprite does. This is helpful for games where something needs to continue to happen (like snowflakes falling from the sky) but you don’t want to individually code each snowflake!
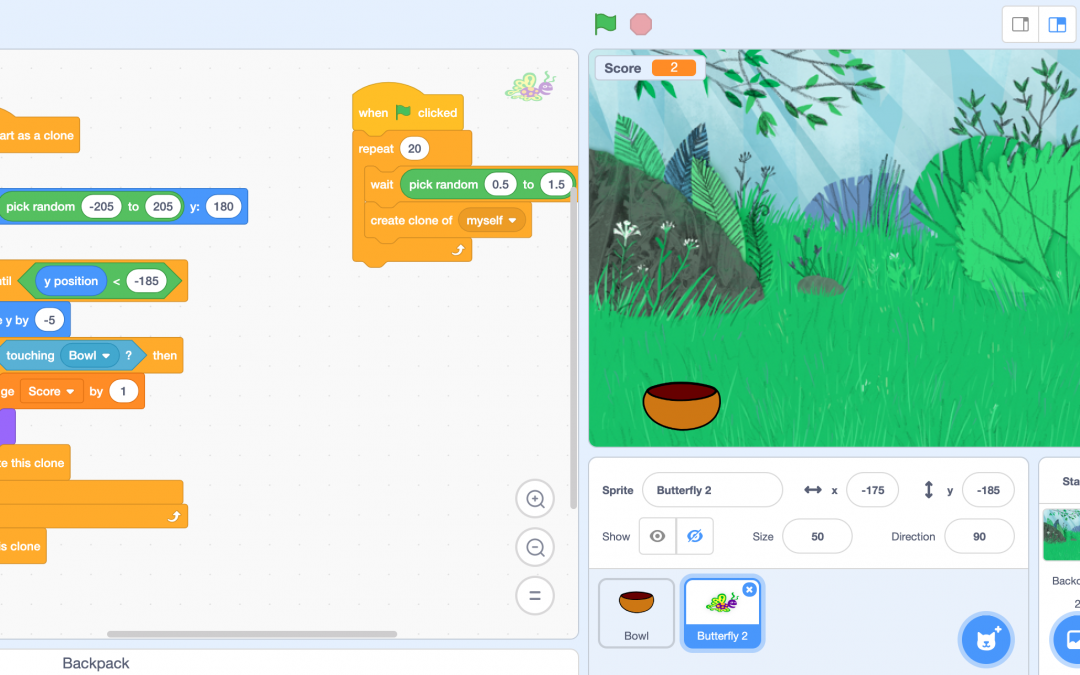
In the “clone collecting” game, something falls randomly but repeatedly from the sky. The player uses some kind of receptacle to collect the clones before they land on the ground. If you want to, you can add in a score variable, whereby the score goes up for every object caught in the receptacle and possibly down for every object the player does not catch.
For this game, I have players choose a background, something that might logically fall in that background and something to collect the falling objects in. For mine, I chose a forest background, a falling butterfly and a bowl to collect them in.
The bowl can be moved back and forth using the right and left arrow keys, like in the previous game. A variable called score can be set up. For the falling object (the butterfly) begin by deciding what you want one butterfly to do. Basically, you want it to hide, then go to a random x coordinate near the top of the screen where it will appear. From there, you want it to fall (change y by negative 5 in this case) until it reaches the bottom of the screen, where it disappears (deletes in this case). If it touches the receptacle, the score goes up and the butterfly disappears/deletes. Once you have written the code, you initialize the butterfly falling by adding the event “when I start as a clone.”
On the same screen, you want to tell the butterfly that when the game starts it should create a clone of itself. It told mine to do this 20 times and in addition, I had the clones randomize how often they fall. I have not finished building in the score in this game.
Here is the link to my game. Here is a tutorial on creating clones.
Hopefully, these game frames will help you and your students understand how to build some basic games. From there, the sky is the limit!